1
My blog has moved!
You should be automatically redirected in 5 seconds. If not, visit
http://kitchentablescraps.com
and update your bookmarks.

Monday, February 14, 2011

Citrus Supremes

The fancy way of cutting off all of the membranes around citrus segments is called supreming. Since I recently posted a recipe calling for supremes, I thought it might be helpful to update with a step by step guide through cutting supremes.

But first, let me beg you t use a really sharp knife for this (serrated blades don't count) . If you don't have a really sharp knife, go get one sharpened. Without a sharp knife this will be an exercise in frustration.

1. Cut off the top and bottom. It might take a few slices until you get cleanly into the fruit.


2. Set the fruit on the now flat bottom and cut the peel away, in strips. Once you have cut one piece away from the fruit, there will be a nice line that you can trace to get the rest of the peel off neatly.

3. Trim away all of the remaining pith.


4. Scrape the fruit and interior skin away from the peel. Reserve peel for another use, such as candied peels.

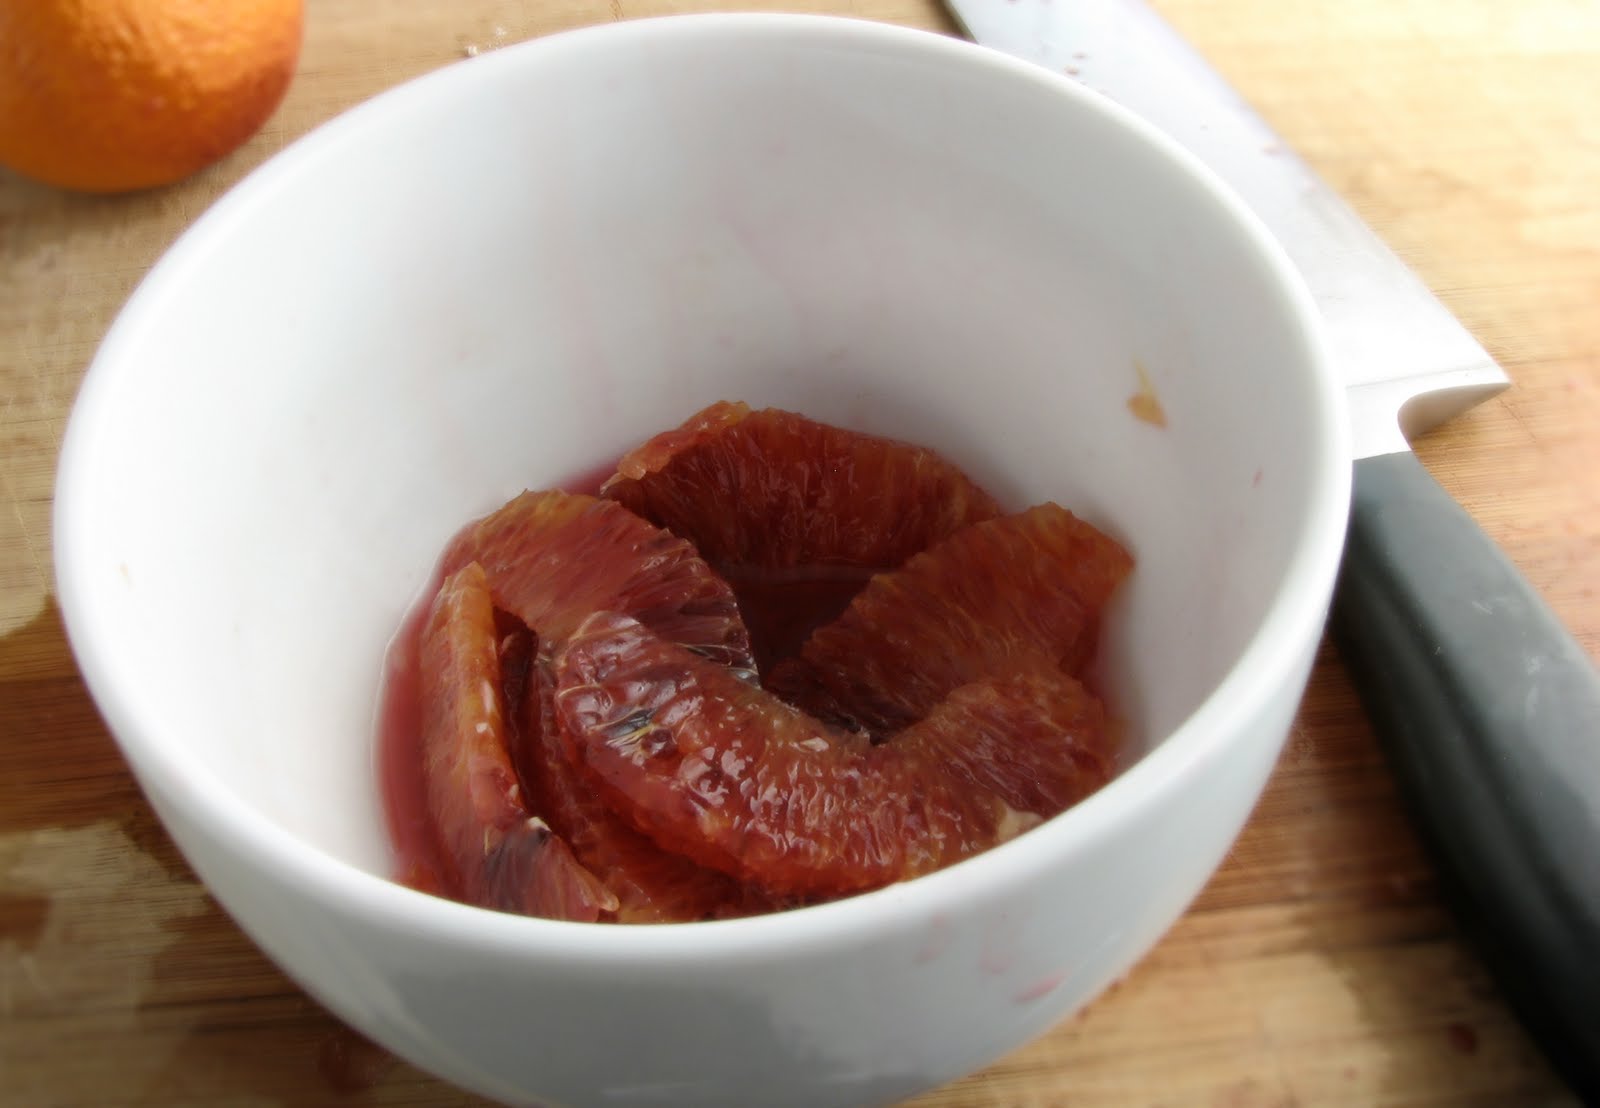
5. Cut each segment on the left and right to separate the segment from the membrane. At the end you will have something like a book with orange membrane pages.


6. Squeeze the center skins over your bowl of supremes to get any remaining juice out

* I keep a bag of citrus peels in the freezer until I have enough to warrant making a batch of candied peels. Removing the fruit and membrane is very important for candying. If you do it right when you use the fruit, you'll be all set to candy later.

Thursday, February 10, 2011

Crepe Roses with Blood Oranges and Cardamom


If you have studied classical French pastry, people often expect you to make frilly fantastical cakes. I, however, tend to turn my nose up at these fancy-for-the-sake-of-being-fancy confections. Not just because they're not my aesthetic taste, (and they're usually not) but more because I think that food, when executed well, can be stunningly beautiful without three layers of fondant and a marzipan bow. So when it is time to make something that needs a spectacular presentation, (a lovely dessert or decadent breakfast for your valentine perhaps?) I like to create ornamental presentations that work with the particular qualities of the food. Then the ornament is part of the dish, not just extra fluff.

I had a hunch that the pretty, irregular edges of crepes might just make a lovely leaf or petal. And I had also ran across a paper art technique that I thought might be useful in food. Put the two together and you get crepe roses! They look complicated, but they're really not difficult to make. And you won't need lots of special equipment, either. If you have a non-stick or cast iron pan, a squeeze bottle (reused ketchup bottles work well), paper coffee filters and a sharp knife, you're in business. The flavors in this dish were inspired by the classic crepes suzette. But my take is a bit lighter and brighter than its gloriously buttery grandparent. And I threw in some cardamom and orange flower water too, just because they are delicious.

Ingredients:

3 small Blood Oranges

Crepes:
1 egg
3/4 c. flour
1 1/4 c. milk
1 T. butter, melted
1 T sugar
pinch salt
the zest from 1 orange
1/2 t. orange flower water (optional)
1/2 t. vanilla extract

Cardamom Blood Orange Sauce:
2/3 c. blood orange juice
3 cardamom pods
1/4 c. sugar
2 T. Butter

Yield: at least a dozen roses, in this case that will serve two people.

Mix crepe batter: Beat the egg together with the milk, sugar,salt, zest and flavorings. Add the flour a little at a time, whisking vigorously to avoid getting any lumps. Once all of the flour is incorporated, whisk in the melted butter. Cover and refrigerate for a minimum of two hours. Overnight is even better.

Cut oranges into supremes: Cut two blood oranges into supremes. Set aside the supremes and the resulting orange juice. You can do this a day or so ahead of time, just store the orange supremes covered in the refrigerator.

Cook orange juice with spices: Crush cardamom pods and remove the seeds from their shells. Add cardamom seeds along with sugar and orange juice to a small saucepan. Bring the mixture to a boil. Continue boiling until the mixture has lost about half of its volume, it should be slightly thickened and syrupy. Remove from heat. Let cardamom sit in the syrup to infuse while you cook the crepes.

Cook crepes: Place a non-stick or cast iron pan or griddle over medium heat. Lightly coat the surface with butter. Pour about half of your crepe batter into a squeeze bottle. It usually takes a few crepes to make sure that the pan is at the right temperature. Squeeze your crepe batter out in a spiral around the pan. I found it easiest to trace around the outside edge of the pan and then just move up and make a little hook in the center of the circle. You want your crepe line to be about an inch wide, but don't worry about making it perfect. The organic shape of the rose comes from these imperfections.

Remove from pan: Use a thin metal spatula to take a peek at the under surface of the crepe to see if the crepe is browning correctly. Ideally, your crepe should be golden in some parts and still pale in others. When your crepe has cooked through, run your metal spatula all the way around the spiral to loosen it form the pan. I found it easiest to fold the crepe in order to lift it out. Because of the shape there isn't a clear-cut folding plan, just fold things over until you can lift it all with your spatula. Immediately transfer to a round paper coffee filter. Once the crepe has cooled enough to handle, carefully unfold it and return to its spiral shape. Place another coffee filter on top of this crepe, so that you can stack the next one on top. Keep going this way until all the crepes are cooked.


Form roses: Take a spiral off of your stack and set it on a flat work surface. Starting at the outside, roll the spiral up toward the middle. Start rolling rather tightly, but loosen up as you go. When you are satisfied with how the rose looks, turn it over onto it's side and cut a flat place for the rose to sit. You can either place the rose exactly where you want to plate it now, or place it in a deep oven dish lined with parchment paper.

Mix sauce: Strain out the cardamom seeds and return your syrup to a saucepan. Rinse out your squeeze bottle. Reheat the orange syrup until boiling. Remove from the heat and throw in the butter. Whisk vigorously until the butter is incorporated. The mixture should turn slightly opaque. Pour the sauce into your squeeze bottle. You can make the syrup portion of this sauce ahead of time, but once the butter has been whisked in it needs to be kept warm.

Plate: Arrange roses and orange supremes on plates. If you like, you can reheat the crepe roses on the plate just before you serve them. Or you can heat them in the oven and transfer them to their plates. Squeeze sauce over the roses, making sure that some of the sauce gets into the petals.

Tuesday, February 8, 2011

Sangria Jam


It is tricky trying to throw a fabulous party on a thrifty budget. Sangria stretches your most expensive ingredient (wine), but it does it in a sneaky, deliciously fruity way. Yes, sangria is cheaper than your average glass of wine. But it's also festive, bright and delicious enough to avoid the bad rap that stretching recipes sometimes have. Peak citrus season plus inexpensive red plus a little time in the fridge and voila! Sangria-infused party success.

But then there is a slight problem... what to do with all of that leftover fruit? Sure some of the fruit should be attractively ladled into the punch bowl or pitcher, but there's inevitably a big pile of fruit left over. I might be the kind of person who enjoys eating a boozy piece of fruit or two from the bottom of my glass of sangria. So *ahem* I knew this fruit was still good enough to eat. I threw some of the fruit in the punch bowl, but kept most of it in the fridge in the hopes that I could turn it into something useful.

Turns out, this fruit makes a spectacular jam! Boil the fruit until it breaks down then strain out the peels. Add some sugar, pectin and another quick boil and the jam is done. This jam doesn't need any other flavorings to make it interesting-- the combination of fruit and unexpected spicy notes from the wine make this jam tangy, bright and rather addictive. Now you can have your sangria and eat it too.


Sangria

3 bottles of red wine
1/2 c. brandy (optional)
2 lemons
2 oranges
2 apples
1 lime
half of a pineapple (optional)
1/3 c. sugar (adjust to taste)
soda water (optional)

Slice Fruit: Wash all of the fruit thoroughly. Use a vegetable peeler to cut thin strips of peel off one of the lemons. Set these aside in a damp paper towel for garnish. Squeeze the juice of that lemon into your bowl. Slice the rest of the fruit into 1/4" thick slices, leaving the skin on everything except the pineapple. Pour in all of the wine and brandy. Add sugar to taste (start with less than 1/3 c.)

Infuse: Cover your sangria and leave the mixture to infuse in the refrigerator for at least 4 hours, up to one day in advance.

Serve: Use a ladle to transfer the sangria to a pitcher or punch bowl. Throw in a ladle or two of fruit, but keep the rest of the fruit for jam. Serve with a lemon peel garnish and a splash of soda water.


Sangria Jam


6 c. leftover sangria fruit
8 c. water
2/3 - 1 c. sugar
1 t. pectin (low sugar type)*
2 t. calcium water (comes with this type of pectin)
Yield: 2 1/4 c. jam

Boil Fruit: Add water to the fruit and bring to a full boil. Boil, partly covered, for 45 minutes, or until the apples and citrus fruits have completely broken down.

Strain off waste: Pour hot liquid through a strainer. Press gently to extract all of the liquid that you can. Discard the fruit pulp (or reserve for compost). Measure the resulting liquid. You want to have 2 c. If you have more liquid, return the liquid to the stovetop and boil until it is concentrated down to 2 c. If you have too little liquid, add water so that your total volume equals two cups.


Cook/Activate pectin:
Rinse any remaining fruit pulp out of your stock pot. Mix pectin together with sugar. Add strained fruit puree and calcium water. Bring to a simmer and cook, covered for ten minutes.


Store: Pour into clean jar. Refrigerate.** Keeps several weeks in the refrigerator.


* Pectin is a naturally occurring gelling agent. With just the right conditions (the right concentration of acid and sugar) pectin will gel perfectly. Unfortunately, the right amount of sugar for gelling might not be the same as the right amount of sugar to produce the best taste. If you can get your hands on a low-sugar pectin (such as pomona's), you can bypass this whole problem. This type of pectin, in combination with a calcium salt solution, will gel with much less sugar.

**Since this recipe makes just one jar, I'm giving the easy instructions for making jam, so this jam is not ready to be stored out at room temperature. You certainly could sterilize everything and process it, but personally, I wouldn't go to that trouble for just one jar. And I'm pretty sure you'll want to eat this right away anyhow.

Wednesday, January 26, 2011

How to Poach An Egg


Poached eggs are a revelation when they're done right, aren't they? (The gorgeous running yolks! The tender whites!) And they seem like they should be a no-brainer -- what protein is more basic, affordable and universally loved than eggs? And what cooking method is easier than boiling? But when things go wrong in the kitchen you can wind up with a heaving pot full of gray foam and not an edible egg in sight. Sadly, there is no one easy fix. But I have battled the quandaries of untidy whites and overcooked yolks, and I think I can offer some salient advice.

First, a disclaimer. There are two schools of thought when it comes to poaching eggs: mold them (to keep them neat, if a little rigid looking) or don't mold them (they look more natural, but it's easier to mess up). Personally, I do not condone the use of molds, not only for aesthetic reasons ( I like the magic of the round poached egg) but also because I kind of think that molds are cheating. Maybe cheating isn't the right word, but I think this method is really more like cottling an egg (which is an equally delicious way to cook an egg, but why would you cottle without adding garlic and/or truffles?) Okay, there! I've said my piece on the matter, but if you want to buy a mold and find that it helps you out, by all means go ahead, but bear in mind the following instructions are geared toward the unmolded poaching school.


Ingredients:
Eggs (the fresher the better!)
2 qts water
2 T salt
2 T white vinegar

Tools:
2-3 qt. saucepan
large slotted spoon
a small bowl (around 1/3 c. capacity is perfect)
kitchen timer
large bowl filled with ice water for ice bath

Assemble you tools: Make sure all of your utensils are within easy reach from the stove.

Prepare your boiling solution: Both salt and vinegar make eggs firm up more quickly. Use a Tablespoon each of salt and white vinegar for every quart of cooking liquid*. If you are poaching just one egg at a time then you should bring no less than 2 quarts of water to a full boil. If you use too little cooking liquid then your egg will cool down the pot too much, spread out over the bottom of the pot and look like a sad, soggy fried egg.

Boil water: Bring the pot to a full boil. In order to have the liquid at the right temperature I like to bring it first to a full boil, then take the pot off the heat and add the egg. This way you know your water is hot enough (it's easy to think that your water is about to boil, when it is not really there yet). While you are waiting for your water to come to a boil, prepare your ice bath. And don't skimp on the ice, use at least a full tray of cubes, then pour in enough water to cover them.


Drop eggs into liquid: Once your water is at the right temperature (just off boiling) you're ready for the vortex! Crack your first egg into a small bowl. Take your wooden spoon and stir in one motion around the outside of your pot. This will create a little whirlpool. The vortex action will help to keep the whites in a round, compact eggy sort of shape. It doesn't need to be whipping around, just a gentle circular current will do the trick. In one steady motion pour the egg straight into the center of the vortex. Now this takes a lot of time to explain, but really it should happen very quickly, like: Crack. Stir the pot. Into the vortex. Done.

Time cooking: Set a timer for three minutes. Do not walk away from the pot. You want to keep the temperature at a simmer (small bubbles rising) but not at a full boil. So fuss with the heat if you need to, but keep it right there. After three minutes, scoop out your egg with the slotted spoon and immediately transfer it to the ice bath. If you have more eggs to poach, turn up the heat and bring the pot back to a full boil to start the next egg.

Reheat before serving: Because nothing (apparently) can be simple here: there are two ways to reheat the chilled poached eggs for serving. Now, I'm on the verge of a rant about modern poultry raising techniques and the silly standards of the FDA, but you just want to know how to poach an egg, not hear all of that so I'll try to restrain myself. In brief, there is one ultra safe method (that requires a thermometer and a little more time) and another method that just about everyone uses, but still carries some risk of salmonella being present. If you get your eggs from a really good source, then the ultra-safe method is probably a bit cautious. Still, if you're cooking for grandmothers, little kiddos or anyone else with a weaker immune system, I'd pick the safe method.

The ultra-safe reheating method: Pour off some of your boiling water and add cold water until the water is exactly 150 F. Then add the eggs that you want to reheat and keep them at 150 F (reheating on the stove, if necessary) for a full 15 minutes. This heat is high enough to kill any salmonella, but will still leave you with runny yolks.

The easy reheating method: Plunge the egg into hot water (just off of boiling) for about 30 seconds and then serve.


*It is worth noting, that you do not have to poach eggs in water. Wine, broth and butter are all (I'm told) good for poaching. But I'm cheap, and so I can't really see buying even a cheap bottle of wine just to pollute with shards of cooked egg white. I'd rather make a wine reduction sauce to serve the egg with.

Tuesday, January 18, 2011

A Colorful Look At The New School Lunch


Last week the USDA released new nutritional guidelines for school lunches as part of the Health/Hunger-free Kids act of 2010. I trust I am not alone in saying it's about time. The new guidelines are meant to do lots of sensible things like increasing the amount of whole grains and fresh fruits and vegetables while limiting the amount of saturated fat, calories and sodium in school meals.


For the past couple of months I have been teaching the cooking portion of a cooking/nutrition course for 8-10 year olds. I try to get them excited about cooking (pretty easy) and to make the healthy offerings exciting for them to eat (mixed results). While I am pretty good at predicting what foods adults will like, I am still in the process of figuring out what makes foods appealing to kids. If I have learned anything in this regard, I have learned that visual presentation is key. The color, shape and texture of foods seem to be as important to kids as what is in them. Strange colors and textures can be cause for suspicion, but on the other hand they can also make food more appealing. The calculation is complicated and more than a little mysterious.

So I thought, in light of these recent changes, it might be interesting to look at the new school lunch in a visual way. The first illustration I made is of the two sample lunch menus that the USDA provides. The second is all of those same foods for one week of meals, but this time organized by color. I arranged the foods this way, not to make an argument about the nutritional content of the food based on its color, but to look at the menus side by side, and see what this comparison teases out of these new changes.

Tuesday, January 11, 2011

When good foods turn bad pt 1: vegetables


It is the time of year for new year's resolutions. So *ahem* here goes: This year I will resolve to waste less food. True, I do save a lot of food, but there is certainly room for improvement. I have the bad habit of squirreling things away somewhere in the back of the fridge that, weeks later, surprise me in a pungent and colorful fashion . I know that I am not alone in this quandary. In fact, I think that we all share that experience of pulling something out of the fridge, taking a whiff and then looking around to get a second opinion. But which kinds of spoilage are merely cosmetic, and which will make you sick? And how can this experience be avoided? For the home cook concerned with efficiency, these are rather important questions. So I begin a short series on foods of questionable edibility. First stop: vegetables!

At the risk of sounding like your mother, let me interject a brief lesson on food safety. With vegetables, the troublemakers are either dirt, your hands or your cutting board. So always wash your hands, cutting board and knife before you start preparing your food. Second, the best time to wash vegetables is right before you prepare them. Washing veggies damages the skin, and and can lead to them spoiling or drying out faster than unwashed veggies (though I make some exceptions to this rule). If vegetables have areas that are packed with dirt (the root end of onions and leeks, for example) cut these areas off before washing the vegetable, then you're not spreading the dirt around to the inside of the vegetable. All that said, most vegetables pose a very low risk of food born illness, the real challenge is to buy in the right quantities and store in the right way that they don't go bad before you have a chance to eat them up. On to the nitty gritty.

Potatoes & Root Vegetables: Potatoes don't rot in a stinky sort of way, but they have a very colorful number of ways of going awry (what else grows eyes?!) Sprouted potatoes are not just unattractive, they're bad for you. The green portions and the sprouts have unhealthy levels of a naturally occurring toxin called solanine. The best to avoid sprouting is through proper storage. Your ideal storage is in a paper bag or box in a cool place (think garage or basement) and with an apple. The fumes exuded by the apple will extend the lifetime of the potato. The fridge is also an acceptable storage space for potatoes if you need a very long term storage. But you can leave them out at room temperature for around a month, provided you keep them away from the light and use the apple-in-the-bag trick. If you do find with potatoes with eyes, cut away all of the green, and the rest of the potato will be safe to eat. Other root veggies like carrots and beets are fine to eat, even if they get a little dried and limp. If you have a cold, well ventilated garage or basement, this can make a good root cellar, which is really how root vegetables want to be kept. Otherwise the fridge will suffice. If you buy roots with the stems on, remove the stems and store them separately (the stems will still be trying to grow and sapping the roots of some of their goodness).

Garlic & Onions: The garlic and onions that you typically buy in the store are all conditioned to withstand longer storage. The plants are edible in their younger, milder forms (spring garlic & onions), but they are much more perishable. Garlic or onions that have sprouted are still good to eat, but the sprouts have an unpleasant, bitter flavor. For sprouted garlic, cut each clove in half and remove the green sprout. Do the same for onions. If onions have a bruised area, simply cut it away before cooking. To keep your garlic and onions, search for firm garlic and onions and store them in a cool place without light.

Sprouts: I don't use sprouts much. And if you've ever made your own sprouts, you know how specific the conditions for hygienic sprouting are. If sprouts are not kept properly either during their growth or storage, they can harbor some nasty bacteria. So... just be careful with them. Think of fresh sprouts like fish: only buy them from stores you trust and don't buy them more than a day in advance especially if you plan to eat them raw.

Greens: I'll divide greens into three categories: crisp, tender and hearty. Crisp greens (romain, iceberg lettuce) do not keep long, and need to be kept, well, crisp. Crisp greens should be kept in a plastic bag (but not fully sealed) and preferably swaddled with a damp paper towel or two. Tender greens (spinach, arugula, butter lettuce) do not turn limp and brown like the crisp guys. They dissolve into green slime. Moisture is slightly less important for these greens, but aeration is key. Skip the paper towels and just store in an unsealed plastic bag. Hearty greens (cabbage, broccoli, kale) have a much longer holding time and tend to turn yellow or brown as they go bad. These veggies should be stored in an unsealed bag. If they have yellow or brown spots, remove discolored areas or leaves. The good news with all types of greens is that if they have started to go bad, then picking through them, you can typically salvage a lot of the plant. The prevailing wisdom is to not wash these veggies ahead of time, but right before you use them. I ignore this advice for everything but crisp greens. I wash and thoroughly dry my tender and hearty greens and store them in plastic shopping bags. If I don't have to wash and dry them first, I find that I use them up faster, and throw less away. But that's just me.

Mushrooms: I know that there is controversy about this but I don't wash my mushrooms. Mushrooms are like sponges, and washing them introduces a lot of excess water, this absolutely affects the way that they cook. When you wash a mushroom you do wash off the dirt clinging to the outside, but then a portion of that dirty water is absorbed right back into the mushroom. I use a clean cloth to remove all dirty areas and to carefully rub the surface clean. Mushrooms are very delicate, so the best storage advise is to handle them as little as possible. Keep mushrooms that come in a plastic-wrapped carton in their original container. Mushrooms bought in bulk can be stored in an unsealed plastic bag with a damp paper towel. The best place to store mushrooms is not in the fridge-- again, this is a good place for them to pick up moisture. That cold, dark garage or basement is better if you have it. If not, the fridge is a good second option.

Saturday, January 1, 2011

Black Cake


Ultimately there are only a few ways to save money in your food budget-- eat lots of cheaper foods, eat less expensive foods, don't waste valuable trimmings, make things yourself. Usually my posts fall into the eat cheap foods and DIY categories. But were still in the thick of celebrating the new year, and even with a thrifty food budget, I think there is place for a little decadence. Expensive, rich ingredients feel even more precious when they are eaten sparingly, and with great relish. And for my money, nothing says wintry decadence like dried fruits and nuts soaked in rum. And don't worry if you normally hate fruitcake; unless you grew up in the Caribbean, this is not your grandma's fruitcake. Admittedly I am a teensy bit obsessed with regional variations on fruitcake (and there are so many interesting cakes out there). But even in a field of many wonderful winter fruitcakes, this one is truly unique.

Enter black cake, the amazingly delicious fruitcake of the Caribbean. Black cake is a descendant of the English Christmas pudding which has been infused with Caribbean ingredients, tastes and a certain tropical joie de vivre. I knew that I was going to love this cake before I had tasted it, and not just because of the raves about black cake's mellow-yet-wildly-fruity taste. The techniques and ingredients were interesting and unique enough to push all of my pastry geek buttons. The backbone of black cake is the fruit. Rather than the garish preserved fruits typical of American fruitcake, black cake highlights the unheralded dark dried fruits: dried prunes, currants and raisins. Then sugar (a local ingredient for Caribbean bakers) is untilized in many forms: brown sugar, white sugar cooked to a dark caramel, and finally fermented sugar, or rum, is used to soak the fruit before baking, and the whole cake afterward. The cake bakes at a very low temperature for a long time, which is typical of the English Christmas pudding, and also helps to gently bake all of that dried fruit. Afterward the whole thing is doused in a mixture of rum, brandy and sherry. In the thrifty spirit of using what you have on hand, I think it's fine to use a mix of whatever appropriate dried fruit and liquors that you have.

I adapted this recipe from one given to me by the lovely folks at Uncommon Caribbean. I futzed with the technique a little bit, scaled it down and made a few substitutions for ingredients that might be hard to find in an American grocery store. And I couldn't resist adding the Caribbean specialty, angostura bitters, that some recipes call for. Enjoy, and happy new year!

Yield: (2) 9 1/2" X 4" loaves

Ingredients:

4 c. dark-colored dried fruit (prunes, raisins, sweet cherries and currants)
1 1/3 c. dried sour cherries
1/3 c. candied orange peel
1/3 c. almonds
1 c. dark rum

1/3 c. sugar
1/4 c. water

1 c. butter (2 sticks)
1 c. dark brown sugar
the zest from 2 limes
1 t. Angostura bitters
1/2 t. salt
5 eggs
2 c. flour
2 t. baking powder
1 t. cinnamon

1 c. combined rum, sherry and brandy

Soak fruit.
Measure out all of your dried fruit and nuts. Place all of the dried fruit and rum into a sturdy, sealable plastic bag. Try to squeeze out as much air as possible so that the fruit is submerged in rum. Leave out at room temperature for at least two days. Potentially, you could soak your fruit months before baking.